Recently I got involved with the OctoFarm software created by James Mackay and David Zwart. I helped them creating a Chocolatey package called OctoFarm. This installs the latest LTS Release of NodeJS, MongoDB and OctoFarm on your Windows machine. If you are not familiar with Chocolatey have a look at their Why Chocolatey in their documentation.
Based on feedback from the community we learned that there was a high need for a Raspberry Pi image. With this image they wanted to be able to run OctoFarm easily. There is documentation on how to set it up, however the community asked if an Raspberry Pi image could be created. This is where I stepped in. Over the last past weeks I have been working with a tool called CustomPiOS by Guy Sheffer (guysoft) to achieve this. I have based my scripts on the OctoPi scripts that Guy created. I am also using GitHub Actions and GitTools’ GitVersion and GitReleaseManager to build and release the image.
Page Contents
Hardware requirements
FarmPi depends on NodeJS LTS and MongoDB, the latter is a 64-bit only software. Because of this requirement, only a 64 bit image is usable. Currenly RaspberryPi OS only has a beta 64-bit image. Therefore we are using the Ubuntu 64 bit Raspberry Pi image as a base image for our image. Due to this 64-bit requirement, only the Raspberry Pi 3, 4 and 400 series are usable. These are the only Raspberry Pi’s that have an 64-bit ARM processor available.
The Raspberry Pi devices have CPU different speeds and memory limitations. Therefore we have to suggest limits on the amount of printers attached to the OctoFarm instance on the Pi. The number of printers are a guesstimate based on our tests and might change in the future.
| Raspberry Pi | Number of Printers |
|---|---|
| 3A+ | 5 |
| 3B / 3B+ | 10 |
| 4B – 2GB | 20 |
| 4B – 4GB / 400 | 40 |
| 4B – 8GB | 80 |
Aside from the Raspberry Pi, you’ll need some additional hardware. In the list below you’ll find all the hardware you’ll need.
- Raspberry Pi 3 or 4, based on the number of printers and expected growth. If you currently have 15 printers, I would suggest the 4GB Raspberry Pi. This gives you a lot of room for growth.
- Cooling for your Raspberry Pi by using a Fan or heatsinks
- An Class 10 micro SD card, 8GB or greater. More printers and/or a more print history, require a bigger SD card. I would like to suggest a 16GB or 32GB SD card. Don’t go cheap on the SD card, get one of the bigger brands like SanDisk or Kingston.
- A power adapter compatible with your Raspberry Pi. The Pi 3 uses a Micro USB connector and the Pi 4 uses an USB-C connector. If available I would like to suggest the original Raspberry Pi adapter.
- An Raspberry Pi case, you can print or buy one. The cases for a Pi 3 and Pi 4 are not compatible. Make sure you have the correct case for your Pi
- Ethernet cable and a switch / router where you can plug the other end of the cable in or Wifi. An Ethernet cable is more stable than Wifi. Therefore I would like to strongly suggest Ethernet over Wifi
- An SD Card reader and, depending on your reader, an adapter.
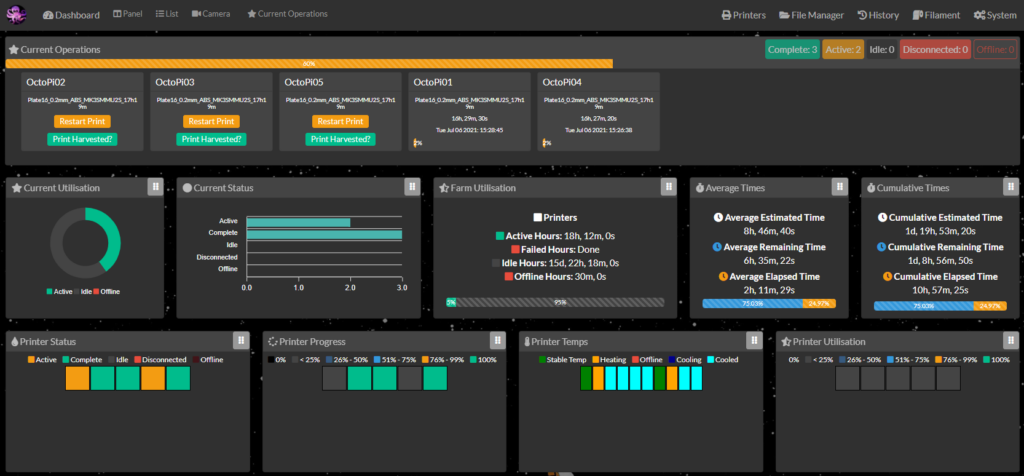
About FarmPi
I wanted to keep the use of FarmPi as simple as possible, basically with the same intention as OctoPi. This is an Raspberry Pi image that the community is already using to control their 3d printers.
Where to get it
The Pi Image is downloadable from the GitHub repository or our official mirror (links below).
Download the latest stable build:
Download the latest stable build (mirror):
For nightly builds, check the GitHub repository (provided as-is)
How to get started
Once you have downloaded the image, we can start flashing the SD card with our image.
The image comes compressed using the commonly known Zip compression. Most, if not all, of the operating systems have a tool available to extract a Zip archive. I would like to suggest one of the following tools:
- 7-Zip (Windows)
- The Unarchiver (Mac)
- Unzip (Linux)
Warning: Make sure there isn’t anything on that SD card that you want to save, after flashing all data on that card will be gone!
When you have extracted the image, you can write it. How you write the image to the SD card depends on the operating system you are using. I would like to suggest to have a look at the Official Raspberry Pi documentation for flashing the image.
Configure Wifi (optionally)
Note: If you intend to connect your Raspberry Pi to your network using an Ethernet cable, you should skip this step. In the case of using Ethernet make sure to connect the UTP cable now.
To make sure your operating system has read the SD card correctly, safely eject the card and insert it again. Your operating system might ask you to format a volume or disk on your SD card. Do NOT format your SD card volume! If you did this by accident, you’ll need to go back and flash your SD card again.
Depending on your OS configuration, an File Explorer window might pop up. If it does not show, there should be a volume that is named “boot”. Inside that volume there are a couple of .txt files. One of them is “farmpi-wpa-supplicant.txt” Open this file in a suitable text editor. Suggestions for better text editors are shown on top of the file.
I am assuming your Wifi network is configured with WPA or WPA2. If you are not sure, you should check your router configuration.
Inside the “farmpi-wpa-supplicant.txt” file that you just opened in your editor, you’ll find a section that starts with “##WPA/WPA2 secured”. Remove the hashtag (#) before the four (4) lines underneath that line and edit the ssid (Wifi network name) and psk (Wifi network password) values. Both the SSID and psk should stay surrounded with double quotes (“).
Almost at the bottom, a line with “country=GB” is shown. Change the letters of the country to match your two country letters. In my case this would be “NL”. Check this list if you are not sure what letters to use.
Once you have changed your settings, save the file and close the editor.
Booting your Pi
When finished with flashing and your (optional) Wifi configuration, attach you heat sinks and/or your Fan (read the documentation for the fan on how to attach it correctly), insert the Raspberry Pi into your case if you have one and insert the SD card into your Raspberry Pi. If you are using an UTP cable, make sure it’s connected. After that, insert the USB connector of your adapter into your Pi and the adapter in a power outlet. You should wait a couple of minutes before you can continue. The Raspberry Pi is booting and will require some minutes to boot. During first boot the Raspberry Pi will extend its diskspace, create some certificates and keys.
Once the Raspberry Pi is booted and your network allows it, you can connect to it using http://farmpi.local. If your network does not allow it, you’ll need to find the IP address in your DHCP server, usually this is your router. Refer to the router documentation to find the DHCP server and the IP address.
If you are unable to find the IP of your Pi, you could attach a HDMI screen with an (micro) HDMI cable and an USB keyboard. You should be able to login to your Pi using the default credentials pi/raspberry.
You should now be able to configure OctoFarm!
Additional changes.
There are some additional changes that I would like to suggest that you should make. The image comes with a default password for the “pi” user: “raspberry” and is set to the GMT time zone. I believe you should change these.
With your favorite SSH tool, connect to your FarmPi machine on the “farmpi.local” address or the IP address you found in your router.
Due to the fact that we are not using a Raspberry Pi OS, the well known tool “raspi-config” is unavailable. We need to make changes manually.
- To change the password type “passwd” and follow the instructions on the screen.
- To change the timezone run “sudo dpkg-reconfigure tzdata” and select the correct time zone for your location.
- Optionally: change the hostname run “echo myhostname | sudo tee /etc/hostname” where myhostname is the new hostname of your Pi, you’ll need to reboot for the changes to take effect using “sudo reboot”.
Happy Farming and enjoy your Pi! 🙂
Could you run FarmPi on an Orange Pi One running Ubuntu?
Hi Roger,
It might work, I never tested it. The image is using an Ubuntu Raspberry Pi image. If that works on an Orange Pi, you’ll probable be good to go.
well I never got the orange Pi…. but I did get a Raspi 3B+ and installed the image of FarmPi on it and it doesn’t find either of my printers. they are both on, with port 5001 for both of them, and no matter what I have tried it only shows the Host State in green and the printer state and websocket are both red. is there something in the config that I need to change? or something to look for?
any help would be great, thanks.
Hi Roger, sorry for the late reply
A lot of things might be causing this. Probably a setting in your OctoPrint. Have a look at the documentation on how to set it up or reach out on the OctoFarm Discord