Today I am going to help you set up Docker and Portainer on your Synology NAS. I’ll be using the Synology that I recently received.
I am assuming you don’t have anything installed on your Synology other than DSM. Skip the steps you have already done.
Page Contents
Docker
To start, we need to install Docker. Docker is software to run containers. Containers contain self-contained pieces of software. This could be, for example, a database container, or a web service like NetBox.
Docker installation
Installing Docker on your Synology NAS is done using the Package Center.
- Open the Package Center
- Search for Docker (called Container Manager on DSM 7.2)
- Click Install

Depending on your network speed, installation should be fairly quick. Once installed, close the Package Center.
Portainer
Once Docker is installed, the easiest way to continue is by using Portainer, a web interface to manage Docker Containers. While all of this can be done on the console, Portainer makes it easier to explain.
Portainer installation
To start, we need to create a folder for Portainer to store its data.
- Open File Station
- Select the docker folder on the left side
- Click Create -> Create folder
- Call the new folder portainer. All lowercase

After creating the folder, we are going to run a User-Defined script, this will run once and could be deleted afterward. This way you should not be required to enable SSH on your NAS. Which could be a security issue.
- Open the Control Panel
- Click on Task Scheduler
- Click Create -> Scheduled Task -> User-defined script

A new dialog opens for creating a new task.
- General Section
- Change Task to something meaningful, e.g. Install Portainer.
- Change the User to root.
- Uncheck the checkbox for Enabled.
- Schedule Section
- Change the radio button to Run on the following date.
- Change the drop-down to Do not repeat.
- Task Settings
- (optionally) Check the checkbox for Send run details by email.
- Enter your Email address in the Email field
- Add the code below in the User-defined script section.
- Click OK
docker run -d --name=portainer \
-v /var/run/docker.sock:/var/run/docker.sock \
-v /volume1/docker/portainer:/data \
-p 8000:8000 \
-p 9000:9000 \
--restart=always \
portainer/portainer-ce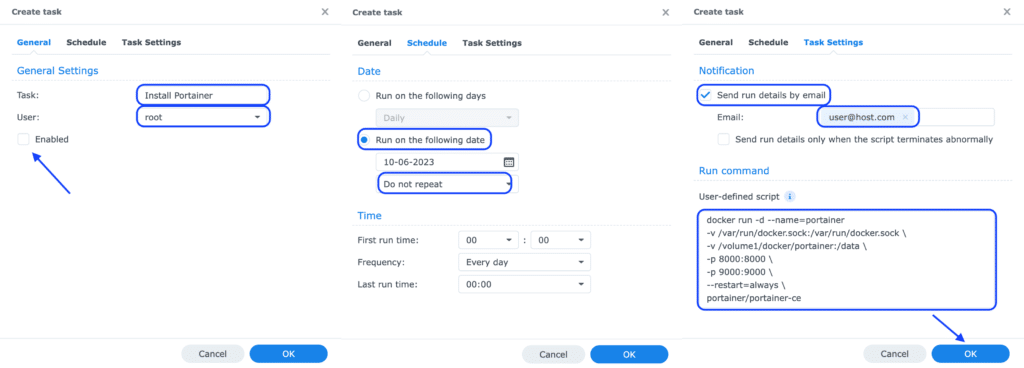
Once you click on OK, you will get a warning message because you are running this command as root. In this case, it is required to run this command as root and it’s perfectly safe. Never run commands when you don’t feel comfortable or do not know what the command is doing. Click on the Red OK button

Starting DSM 7.2, you will get a request to enter your password after this. Enter your password and click Submit

Select your task, click Run, and then Yes

Portainer Configuration
After running the task, go to http://ip-of-synology:9000 or use its hostname if it’s in your DNS. Portainer installation should pop up. Enter a username, password and (optionally) uncheck the Allow Collection checkbox and click on Create User

After creating the user, you will be presented with a quick start. Just click on Get Started to continue

When that page is loaded, click on the pencil to edit the local configuration.

In the Public IP field, add the IP address of your NAS, for example, 192.168.1.2, and click on Update Environment.

Feel free to remove the scheduled task, if you want to.
Maurice;
Thank you so much for this unbelievable resource. It was so easy to follow and made it possible to move forward with a small project. I can imagine it took a good bit of time, I really appreciate you efforts to help others.
Sincerely appreciated.
Jim